What the Strain System Is
Gambonanza’s difficulty is not a single slider. It is a ladder of tiers, and each tier above the first adds modifiers called Strains. A Strain is a rule change. It might raise prices, shrink your Stock, change who plays first, or remove a system entirely.
The design intent is clear from the developer’s own notes: the base game should be a playground where breaking it is fun, but higher tiers are meant to punish mistakes. The Strain system is the mechanism that makes the punishment scale. On PAWN, you get room to experiment. On KING, you get a challenge the developer has openly said they have not beaten themselves.
The Difficulty Ladder
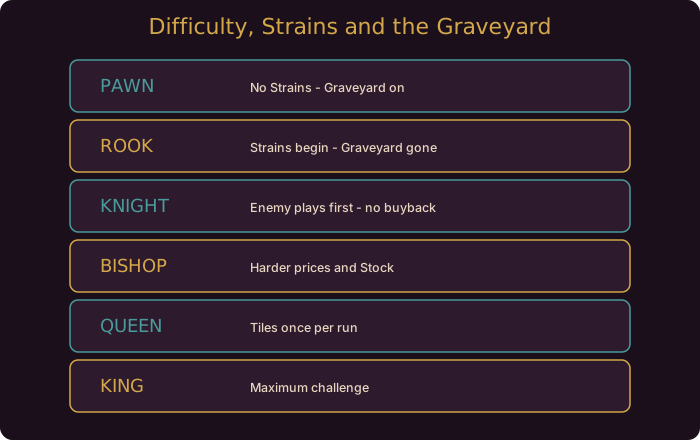
The exact set of Strains at each tier is not fully enumerated by the developer in the patch notes, but the shape of the ladder is well established from the game’s own progression and the 1.4 notes. Here is the ladder as the game presents it:
| Tier | Character | Key Difference |
|---|---|---|
| PAWN | Learning tier | Graveyard safety net is active |
| ROOK | First escalation | Higher prices, WAIT costs more, less Stock room |
| KNIGHT | Real difficulty | Enemy plays first, Queens leave the Shop, tiles single-use |
| BISHOP | Harder | Tightened economy and Stock pressure |
| QUEEN | Severe | Tiles limited to once per run |
| KING | Maximum | The big challenge tier |
The precise modifier list per tier is visible in the in-game Strains menu, which is why reading it matters more than memorizing a table from a guide.
The Graveyard Is the PAWN Safety Net
The Graveyard is the system most tied to difficulty. It holds your last five lost pieces during a run, and on PAWN you can spend gold to buy them back, with each recovery raising the cost of the rest. It is a genuine second chance for learning a build.
The critical detail: the Graveyard disappears from KNIGHT upward via the Strain system. This is deliberate. At higher tiers, losing a piece is supposed to hurt, so the game removes the buyback option to keep the risk calculus honest.
The practical takeaway is that your recovery planning is tier-dependent:
- On PAWN, you can afford to be a little loose. The Graveyard catches your worst variance.
- From KNIGHT up, treat every loss as permanent. Play like the safety net does not exist, because it does not.
Our Graveyard system guide covers the buyback math, and the Stalemate resets the Graveyard guide covers the 1.5.1 reset rule.
Why Reading the Strains Menu Matters
A common mistake is to start a climb and then feel confused when prices are higher or the enemy moves first. Those are Strains, and the game lists them. The menu was made easier to navigate on controller and Steam Deck in the 1.5.3 hotfix, which suggests the developer knows players need to consult it.
A quick pre-climb ritual:
- Open the Strains menu.
- Read each modifier aloud or in your head.
- Ask whether your current build tolerates them.
- Only then commit.
This takes less than a minute and prevents the most common “why is this run so hard” confusion.
A Practical Example
You are comfortable on PAWN and decide to climb to KNIGHT. Before you start, you open the Strains menu. You see that the enemy plays first, Queens are removed from the Shop, and tiles can only be used once per run. Armed with that, you adjust before the first turn: you plan for a slower opening because the enemy moves first, you stop assuming you can buy a Queen later, and you commit to your tile choices because you cannot reuse them.
Those three adjustments are the entire difference between a KNIGHT climb that feels fair and one that feels brutal. The information was always available. The skill is reading it.
What This Means for Your Builds
- Tier defines your safety net. PAWN has the Graveyard; KNIGHT and up do not.
- Strains are the real difficulty. Read them before committing to a climb.
- Builds must adapt to tier. A build that relies on a Shop Queen will fail on KNIGHT.
- No P2W shortcuts. Higher tiers are meant to punish mistakes, and the Strain system enforces that.
Where To Go Next
If you want to go deeper on the systems referenced here, read the Graveyard system guide and difficulty guide. They cover the mechanics this patch touches in full detail.
Open the Strains menu before every climb. It takes under a minute and prevents the most common mistake in the game: not knowing which rules the tier just changed.
Community Resources
Guide updated for Gambonanza v1.5.x (released August to September 2026). The Graveyard tier gating and difficulty escalation are described in the official v1.4.0 and v1.5.x Steam news posts.